- Prepare the Ingredients

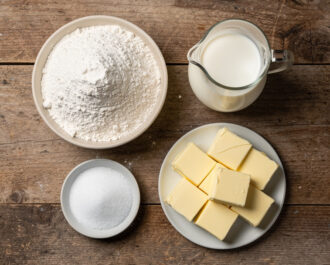
Gather all your ingredients: 2 1/2 cups all-purpose flour, 1 1/2 cups whole wheat flour, 1 teaspoon baking soda, 1 teaspoon salt, 1 3/4 cups buttermilk, and 2 tablespoons unsalted butter, melted. Preheat your oven to 425°F (220°C). Lightly grease a 10-inch cast iron skillet or a baking sheet. This prep ensures a smooth, uninterrupted baking flow.
- Mix the Dry Ingredients
In a large mixing bowl, whisk together the all-purpose flour, whole wheat flour, baking soda, and salt. Ensure the baking soda and salt are evenly distributed throughout the flour mixture to guarantee even leavening and seasoning in the final loaf. A thorough whisk here prevents pockets of unmixed leavening agent.
- Combine Wet & Dry
Make a well in the center of the dry ingredients. Pour in the buttermilk and the melted butter. Using a wooden spoon or your hand, stir gently until the mixture just comes together into a rough, shaggy dough. The dough will be sticky and look a bit messy—this is perfect. Stop mixing the moment no dry flour remains visible. Overmixing is the enemy of a tender soda bread.
- Shape & Score
Turn the sticky dough out onto a lightly floured surface. Gently pat and shape it into a round loaf, about 7 inches in diameter. Do not knead it. Transfer the loaf to your prepared skillet or baking sheet. Using a sharp, floured knife, score a deep 'X' across the top, nearly to the edges. This helps the heat penetrate and allows the bread to expand properly in the oven.
- Bake & Cool
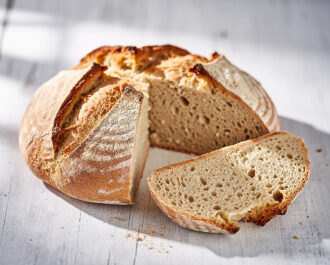
Place the skillet or sheet in the preheated oven and bake for 40-45 minutes. The bread is done when it is deeply golden brown, sounds hollow when tapped on the bottom, and an inserted skewer comes out clean. Transfer the loaf to a wire rack and let it cool for at least 20 minutes before slicing. This resting time allows the crumb to set, making it easier to slice without crumbling.
- Calories:220 kcal
- Protein:6 g
- Carbohydrates:40 g
- Sugar:2 g
- Salt:0.4 g
- Energy:920 kJ
- Fat:4 g
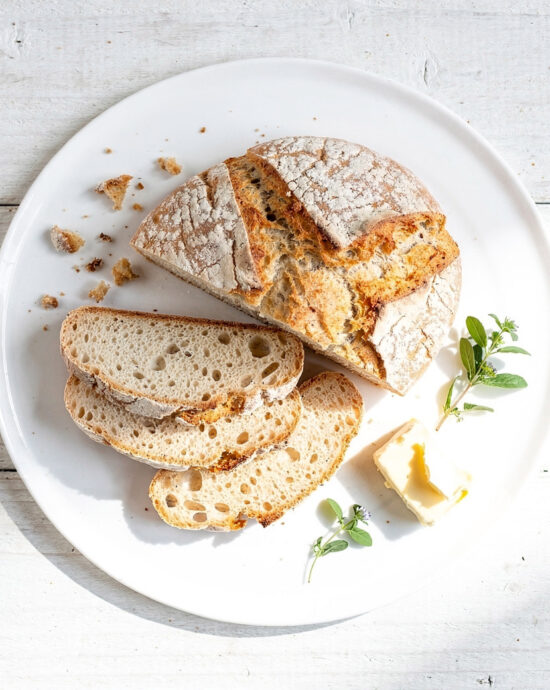
There’s a certain, specific craving that only homemade bread can cure. It’s not the perfumed pull of brioche or the architectural grandeur of a sourdough boule. It’s something earthier, humbler, and infinitely comforting. It’s the scent of a just-baked, craggy loaf filling your kitchen in under an hour. That’s the magic I found when I first nailed my soda bread with buttermilk recipe. I used to think quick breads were a consolation prize, until I discovered that this one is actually the grand prize. The buttermilk is the secret agent here, creating a tender crumb with a subtle tang that you just don’t get with plain milk.
The humble history of soda bread with buttermilk recipe
Irish soda bread is a legend born of necessity. In the 19th century, with soft wheat and no reliable ovens, rural cooks needed something fast and resourceful. Baking soda (or “bread soda”) was a miraculous leavening agent, and soured milk was often more available than fresh. The marriage of these two ingredients—soda and acid—creates the lift, and over centuries, it evolved into the staple we love. It was, and is, the definition of peasant food made divine. And this particular version leans into that history, celebrating the essential role of buttermilk.
Why buttermilk makes all the difference
What makes this loaf special is its contradictory nature. The crust is rugged and craggy, singing a faint tune as it cools, while the interior is tender and moist, almost cakey. The flavor is deeply wheaty, nutty from the wholemeal flour, and punctuated with a gentle, pleasant tang from the buttermilk. That tang is the “secret” flavor profile—it balances the richness and makes each bite interesting. It’s not sour, but rather a bright note that keeps you coming back for more.
The one pro-tip for perfect soda bread with buttermilk recipe
Do not, I repeat, do not overmix the dough. This is the single most important piece of advice. The moment the wet and dry ingredients meet, the chemical reaction begins. You want to stir just until the flour is hydrated and a shaggy, sticky dough forms. Any more mixing develops gluten, and you’ll end up with a tough, dense brick instead of a light, tender loaf. Think “barely combined” and embrace the mess. It’s supposed to look rough.
Serving & pairing ideas beyond the butter dish
Yes, slathering a warm slice with good salted butter is a religious experience. But let’s think bigger. This bread is a chameleon. Tear it into chunks for a robust stew, like a beef and Guinness pot. For a snack, toast a slice and top it with sharp cheddar and a dollop of apple chutney. Its tangy nature loves sweet companions too—try it with a smear of orange marmalade. For a drink pairing, a malty Irish red ale or a cup of strong, milky tea is perfection. Or, for a stunning appetizer, cut it into small squares, toast them, and top with smoked salmon and crème fraîche.
Variations & substitutions for every baker
This dough is a fantastic canvas. Need it gluten-free? Use a 1:1 gluten-free flour blend (ensure it contains xanthan gum). Want it vegan? Swap the buttermilk for a plant-based milk mixed with 1 tablespoon of lemon juice or vinegar. Feel free to stir in a handful of raisins or dried currants for a classic spotted dog, or some caraway seeds and toasted oats for extra texture. A half-cup of grated sharp cheddar folded into the dough creates a savory twist that’s incredible with soup.
Make-ahead & storage tips
This loaf is best enjoyed the day it’s made, but it stores beautifully. Let it cool completely, then wrap it tightly in foil or place it in an airtight container. It will keep at room temperature for 2-3 days. To refresh, wrap a slice in a damp paper towel and microwave for 10-15 seconds, or toast it lightly. You can also freeze the whole, cooled loaf tightly wrapped in plastic and foil for up to 2 months. Thaw overnight at room temperature.
FAQs
Can I use regular milk? You can, but you’ll lose the signature tang and tenderizing power. For a close substitute, add 1 tablespoon of lemon juice or white vinegar to a scant cup of milk and let it sit for 5 minutes before using.
My bread is dense. What went wrong? The most likely culprit is overmixing the dough. Remember, shaggy is good! Also, ensure your baking soda is fresh; it loses potency over time.
Do I need a special pan? Not at all. A simple, well-seasoned cast-iron skillet or a standard baking sheet works perfectly. The skillet gives a nicer crust, but a sheet pan is just fine.
Honestly, the beauty of this soda bread with buttermilk recipe is its forgiving nature and its incredible speed. It’s the antidote to thinking bread baking is a weekend project. In about 45 minutes, you can have a loaf that looks like it came from a professional bakery and tastes like home. So, preheat that oven, grab your flour, and get ready for your kitchen to smell incredible. I promise you, once you try it, it will become a regular in your rotation. Don’t forget to check out our recipe collection for more baking inspiration. And for a deep dive into the science of baking soda, my friends at Serious Eats have you covered. Now, go bake!