- Prepare the Ingredients

Gather your ingredients: 1 cup all-purpose flour, 1 cup yellow cornmeal, 1/3 cup granulated sugar, 2 1/2 tsp baking powder, 1/2 tsp salt, 1 cup whole milk, 1 large egg, and 1/2 cup (1 stick) unsalted butter, melted and cooled slightly. Preheat your oven to 400°F (200°C). Generously grease a standard 12-cup muffin tin with butter or non-stick spray, or line with paper liners.
- Mix the Dry Ingredients
In a large mixing bowl, whisk together the flour, cornmeal, sugar, baking powder, and salt. Ensure everything is evenly distributed and there are no clumps of baking powder. This is your dry base, and doing this first guarantees an even rise and consistent flavor in every bite of your finished muffins.
- Combine the Wet Ingredients
In a separate medium bowl or large measuring cup, whisk the milk and egg together until completely smooth and homogenous. Slowly stream in the melted butter while whisking constantly. You should have a smooth, slightly thickened liquid with no streaks of egg white remaining.
- Fold the Batter Together
Create a well in the center of your dry ingredients. Pour the wet mixture into the well. Using a rubber spatula or wooden spoon, gently fold the ingredients together. Stop stirring the moment the last traces of dry flour disappear. The batter will be thick and lumpy—this is perfect and crucial for a tender texture.
- Bake to Golden Perfection
Divide the batter evenly among the 12 prepared muffin cups, filling each about 3/4 full. Immediately place the tin in the preheated oven. Bake for 16-18 minutes, or until the tops are domed, golden brown, and a toothpick inserted into the center of a muffin comes out clean. Avoid opening the oven door before the 15-minute mark.
- Cool and Serve
Let the homemade corn muffins cool in the tin on a wire rack for 5 minutes. This allows them to set and makes them easier to remove. Then, carefully run a butter knife around the edges and transfer them directly onto the rack to cool for another 10-15 minutes. They are best served warm, when the crust is at its crispiest and the interior is beautifully tender.

- Calories:185 kcal
- Protein:3 g
- Carbohydrates:23 g
- Sugar:6 g
- Salt:0.2 g
- Energy:774 kJ
- Fat:9 g
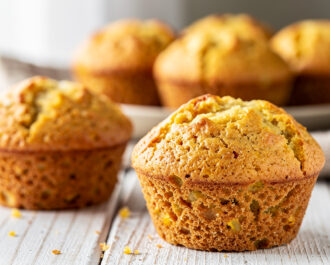
Picture this: a lazy Sunday morning, the scent of coffee brewing, and a deep, almost primal craving for something warm, crumbly, and sweet. That’s the magic a plate of fresh-from-the-oven homemade corn muffins can conjure. It’s a simple, honest craving that store-bought mixes just can’t satisfy. I’ll let you in on a little secret: the best part isn’t just the flavor, it’s the quiet, satisfying process of making them yourself.
The Humble, Honest Story of Homemade Corn Muffins
This American classic has roots stretching back to Native American cooking, where corn was ground into meal and baked in simple, unleavened cakes. The muffin form we know and love evolved later, becoming a staple of Southern and New England tables alike. It’s a bread that tells a story of resourcefulness and comfort, a little piece of culinary history you can bake in your own kitchen.
What Makes These Cornbread Muffins Special
While many recipes produce a dry, dense crumb, this version is all about a tender, moist interior with a delightfully crisp, sugar-crusted top. The “secret” is twofold: a perfect balance of cornmeal to flour for that classic gritty-yet-soft texture, and a generous pat of butter melted into the batter just before baking. This creates a rich, almost custardy crumb that’s far more sophisticated than its humble ingredients suggest.
A Critical Pro-Tip for Perfect Homemade Corn Muffins
Do not overmix the batter. Seriously. Once you combine the wet and dry ingredients, stir just until the flour disappears. A few lumpy streaks are not just okay—they’re ideal. Overworking the batter develops gluten in the flour, leading to tough, chewy muffins instead of the light, tender ones you’re after. Think of it as a gentle fold, not a vigorous stir.
Serving & Pairing Ideas
Of course, they’re sublime split and slathered with honey butter alongside a bowl of chili. But have you ever tried one slightly warm with a sharp cheddar cheese melted inside? Or crumbled over a salad for a crunchy, sweet topping? For a drink pairing, skip the orange juice. A strong, black breakfast tea or a glass of cold, whole milk cuts through the richness perfectly. I also love serving them as a base for poached eggs and a spicy salsa for a savory brunch twist.
Variations & Substitutions
This recipe is wonderfully adaptable. For a dairy-free version, use a neutral oil like avocado or melted coconut oil instead of butter, and a non-dairy milk. Want a bit of heat? Fold in a finely diced jalapeño or a pinch of cayenne pepper. Feeling indulgent? Add a handful of fresh blueberries or a half-cup of shredded sharp cheddar to the dry ingredients. You can even swap half the cornmeal for coarse polenta for an extra-crunchy texture. For a deeper dive into the science of perfect baking, I always recommend checking out the experts at Serious Eats.
Make-Ahead & Storage Tips
These little golden cakes are perfect for meal prep. The dry mix can be assembled days in advance and stored in a jar. For baked muffins, let them cool completely, then store in an airtight container at room temperature for up to two days. To recapture that just-baked magic, pop them in a 350°F oven for 5-7 minutes. For longer storage, freeze them in a single layer on a baking sheet before transferring to a freezer bag; they’ll keep for up to three months. Thaw at room temperature and reheat.
Frequently Asked Questions
Can I use all-purpose flour instead of the mix specified? Absolutely. The recipe is designed with all-purpose in mind for its reliable structure.
My muffins didn’t rise much. What happened? Your baking powder or soda might be old. Always check the expiration date! Also, ensure your oven is fully preheated before baking.
Can I make this in a skillet instead of a muffin tin? Yes! Pour the batter into a preheated, greased 9-inch cast iron skillet and bake for 20-25 minutes, or until a tester comes out clean.
So, what are you waiting for? Grab your mixing bowl and preheat that oven. The satisfaction of pulling a tray of these beauties from the heat, hearing that quiet crackle of the crust as they cool, is a small kitchen joy everyone deserves. I promise, once you’ve made a batch of these, the boxed stuff will forever taste like a compromise. Now go on, bake a memory. And when you do, I’d love to hear about it—tell me your favorite variation in the comments!