- Prepare the Ingredients

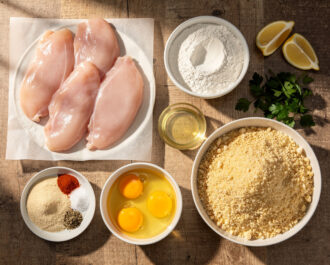
Gather all ingredients: 4 boneless, skinless chicken cutlets, ¾ cup all-purpose flour, 1 tsp each garlic powder and onion powder, ½ tsp sweet paprika, 1 tsp kosher salt, ½ tsp black pepper, 3 large eggs, 2 tbsp whole milk, 1 ½ cups panko breadcrumbs, ¾ cup neutral oil, 1 lemon cut into wedges, and 2 tbsp chopped fresh parsley. Set up three shallow dishes: one for the flour mixed with all dry spices, one for the eggs whisked with milk, and one for the panko breadcrumbs.
- Bread the Chicken
Pat the chicken cutlets completely dry with paper towels. Working with one piece at a time, dredge it thoroughly in the seasoned flour, shaking off excess. Next, dip it into the egg wash, coating both sides and letting excess drip off. Press it firmly into the panko breadcrumbs, ensuring a thick, even coating. Place the breaded cutlet on a wire rack set over a baking sheet. Repeat with remaining cutlets, then let them rest for 10-15 minutes to set the coating.
- Fry to Perfection
Heat the neutral oil in a large, heavy-bottomed skillet (like cast iron) over medium-high heat until it reaches 350°F. Carefully add 2 breaded chicken cutlets, making sure not to crowd the pan. Fry for 3-4 minutes per side, or until deeply golden brown, crisp, and the internal temperature reaches 165°F. Transfer to a clean wire rack set over a paper towel-lined tray to drain. Repeat with remaining cutlets.
- Serve and Enjoy
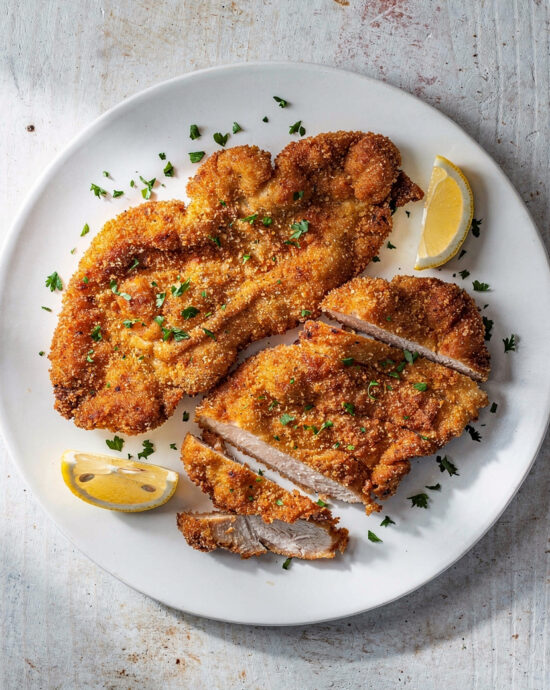
Let the fried chicken cutlets rest for 2-3 minutes on the rack. This allows the crust to firm up and the juices to redistribute. Transfer to a serving platter, garnish with chopped fresh parsley, and serve immediately with lemon wedges on the side for squeezing over the top.

- Calories:490 kcal
- Protein:42 g
- Carbohydrates:28 g
- Sugar:2 g
- Salt:0.8 g
- Energy:2050 kJ
- Fat:22 g
There are few things more universally adored than a perfectly cooked chicken cutlet. You know the one I mean: that juicy interior tucked inside a shatteringly crisp, golden-brown jacket that audibly crackles when you cut into it. It’s the culinary equivalent of a warm hug. Getting that texture just right used to feel like a secret kept by the best diners in town. I’m here to tell you their secret isn’t a special batter; it’s all in the order of operations. Let’s turn your kitchen into that favorite neighborhood spot.
The Humble History of Chicken Cutlets
The lineage of this dish is a delicious tangle. While its soul feels distinctly American-diner, its technique borrows heavily from Italian cotoletta and Austrian Wiener Schnitzel. The idea is simple yet brilliant: tenderize a lean piece of meat, cloak it in seasoned crumbs, and fry it until it achieves a kind of culinary nirvana. Our version today leans into the all-American comfort food ideal, perfect for a quick weeknight triumph or a celebratory Sunday supper.
What Makes This Crust So Special
The magic here is twofold: a double-dip in the egg wash and a pre-seasoned flour base. The first dip creates a sticky, protein-rich glue. After the first layer of breadcrumbs, you dip again, letting that second layer of egg seal the first crumbs in place. This creates a distinct, airy separation between the chicken and the final, crispy exterior, preventing dreaded sogginess. It’s the little extra step that makes all the difference.
A Chicken Cutlets Pro-Tip You’ll Use Forever
Here’s the game-changer I learned the hard way: let your breaded cutlets rest. After you’ve coated them, place them on a wire rack set over a baking sheet and let them sit for 10-15 minutes. This gives the coating time to hydrate fully and adhere. When you slide them into the oil, that crust won’t slide off; it’ll puff up and become incredibly sturdy, creating that iconic, crunchy texture. Patience, my friend, is the secret ingredient.
Serving & Pairing: Beyond the Basic
Of course, you can serve these cutlets nestled next to buttery mashed potatoes with gravy. But for something brighter, try them sliced over a simple arugula salad with shaved Parmesan and a lemony vinaigrette—the peppery greens and sharp cheese cut through the richness beautifully. For a drink pairing, a crisp lager or a dry rosé works wonders. For a non-alcoholic option, sparkling water with a squeeze of lemon and a sprig of thyme is unexpectedly perfect.
Versatile Variations & Handy Substitutions
Need it gluten-free? Swap the all-purpose flour for your favorite 1:1 gluten-free blend and use certified gluten-free panko breadcrumbs. For a dairy-free version, the recipe is already there—just check your breadcrumbs. To bake instead of fry, place the rested, breaded cutlets on an oiled wire rack set over a baking sheet, spray lightly with oil, and bake at 425°F for 18-22 minutes, flipping halfway, until golden and cooked through. You can also swap in boneless pork chops or turkey breasts using the same method.
Make-Ahead & Storage Smarts
You can bread the chicken cutlets up to a day ahead. Store them in a single layer on a parchment-lined baking sheet, cover tightly with plastic wrap, and refrigerate. Let them sit at room temperature for 10 minutes before cooking. Leftovers keep beautifully for 3-4 days in the fridge. Reheat them in a 375°F oven on a wire rack for about 10 minutes to revive the crispness—the microwave will make them sad and soft.
Frequently Asked Questions
Can I use chicken breasts instead of cutlets? Absolutely! Just place a boneless, skinless breast between two pieces of plastic wrap and pound it to an even ½-inch thickness. It will cook in roughly the same amount of time.
What’s the best oil for frying? I prefer a neutral oil with a high smoke point, like avocado, canola, or peanut oil. They allow the flavor of the chicken and seasoning to shine without imparting their own taste.
How do I know when the oil is hot enough? The classic test is to drop a breadcrumb into the oil; if it sizzles vigorously immediately, you’re good to go. For precision, a thermometer reading of 350°F is perfect.
So, there you have it. The path to the crispiest, most satisfying chicken cutlets of your life is right in front of you. It’s a technique that rewards a little extra care with spectacular results. I’d love to hear how yours turn out! Share your stories and photos in the comments, or explore our recipe collection for more inspiration. Now, go make some noise in that kitchen. For more incredible deep-dives into culinary science and technique, I always recommend the brilliant team at Serious Eats.