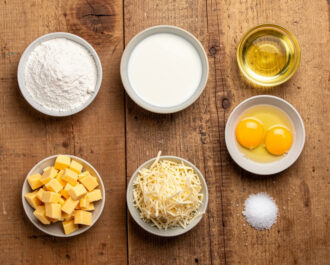
- Prepare the Ingredients

Gather all ingredients: 2 cups tapioca flour, 1 cup whole milk, 1/2 cup vegetable oil, 2 large eggs, 1 cup grated Parmesan cheese, and 1 teaspoon salt.
- Heat the Milk and Oil
In a saucepan, combine the milk, oil, and salt. Heat over medium until it just begins to simmer, then immediately remove from heat. You should see small bubbles around the edges.
- Mix the Dough
Pour the hot liquid over the tapioca flour in a large bowl. Stir quickly with a wooden spoon until a thick paste forms. Let it cool for 5 minutes, then add the eggs one at a time, mixing well after each. Finally, stir in the grated cheese until fully incorporated. The dough will be sticky and elastic.
- Bake the Cheese Buns
Preheat oven to 375°F. Line a baking sheet with parchment paper. With slightly oiled hands, scoop tablespoon-sized portions of dough and roll into balls. Place them on the prepared sheet, spacing about 2 inches apart. Bake for 18-20 minutes, until puffed and golden brown. Let cool for a few minutes before serving.
- Calories:150 kcal
- Protein:5 g
- Carbohydrates:15 g
- Sugar:1 g
- Salt:0.5 g
- Energy:630 kJ
- Fat:8 g
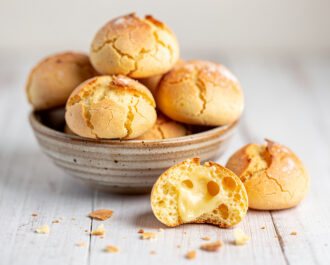
I still remember the first time I bit into a warm, freshly baked pão de queijo. The exterior gave way with a slight crackle, revealing a chewy, airy interior that was utterly addictive. If you’ve ever wanted to recreate that magic at home, you’re in the right place. This brazilian bread cheese recipe is my go-to for authentic, foolproof cheese buns that will transport your taste buds to Brazil.
The Humble Origins of Pão de Queijo
Legend has it that this beloved snack was born out of necessity in the Minas Gerais region, where resourceful cooks transformed leftover cassava pulp into something extraordinary. Over time, it evolved into the cheesy delight we know today.
The Magic of a Great Brazilian Bread Cheese Recipe
The secret lies in the tapioca flour. When combined with hot liquid, it creates a unique, elastic dough that bakes up with a crispy shell and a wonderfully chewy, slightly hollow center. The cheese? It melts into the dough, offering pockets of salty, savory goodness in every bite.
The Blender Trick for Perfect Dough
Here’s my aha moment: using a blender to mix the dough ensures a smooth, homogenous mixture without overworking it. Simply pulse the ingredients until combined. This method is a game-changer for achieving that ideal texture in your pao de queijo dough, making it an easy pao de queijo recipe.
Serving & Pairing Ideas
While these buns are glorious on their own, I love serving them with a strong cafezinho (Brazilian coffee) for breakfast or as a side to a feijoada stew. For a party, offer them with a dipping sauce like chimichurri.
Variations & Substitutions
This brazilian bread cheese recipe is wonderfully adaptable. Whether you call it pão de queijo recipe, brazilian cheese bun recipe, or pan de queijo recipe, this is the authentic pao de queijo you’ve been looking for. For the best brazilian cheese bread recipe, stick to these proportions. The best cheese for pao de queijo is a hard, salty variety like Parmesan. For gluten free pao de queijo, tapioca flour is naturally gluten-free. Making pao de queijo with cassava flour results in cassava flour brazilian cheese bread, though the texture may differ. If you need brazilian cheese bread no tapioca flour, alternatives exist, but for authentic pão de queijo recipe, tapioca is key. This easy pao de queijo recipe can be made with a blender for pao de queijo recipe blender convenience. The pao de queijo ingredients are simple: tapioca flour, cheese, milk, oil, eggs. For brazilian cheese bread with tapioca flour, this is standard, and for chewy brazilian cheese bread, avoid overbaking. The pao de queijo dough should be sticky, and pao de queijo bread is best served warm.
Make-Ahead & Storage Tips
The dough can be shaped into balls and frozen on a baking sheet, then transferred to a bag. Bake from frozen, adding a few extra minutes. Freshly baked buns are best the day of, but they reheat well in a toaster oven.
FAQs
Can I make this without a blender?
Absolutely! While a blender makes for an easy pao de queijo, you can mix by hand. Just ensure the hot liquid is fully incorporated into the flour before adding eggs and cheese.
What’s the difference between tapioca flour and cassava flour?
Tapioca flour is starch extracted from cassava, while cassava flour includes the whole root. For authentic pao de queijo, tapioca flour is key for that chewy texture. However, cassava flour brazilian cheese bread is a common variation.
How do I get my cheese bread to be chewy?
The secret is in the dough hydration and baking time. Don’t overbake; they should be golden but still moist inside. This ensures a chewy brazilian cheese bread. In this brazilian bread cheese recipe, we aim for that perfect balance.
I hope this brazilian bread cheese recipe inspires you to bring a taste of Brazil into your kitchen. Once you master the basic dough, the variations are endless. Don’t forget to check out our recipe collection for more ideas, and for deeper dives into food science, Serious Eats is a fantastic resource. Now, go preheat that oven and get ready for some cheesy magic!