- Prepare the Ingredients

Gather 3 cups of all-purpose flour, 2 teaspoons of instant yeast, 3 tablespoons of granulated sugar, 1/2 teaspoon of baking powder, 3/4 cup of lukewarm whole milk, and 2 tablespoons of neutral oil (like vegetable oil), plus extra for brushing.
- Make & Knead the Dough
In a large bowl, whisk together the flour, yeast, sugar, and baking powder. Make a well in the center and pour in the lukewarm milk and oil. Stir with a wooden spoon until a shaggy dough forms. Turn out onto a lightly floured surface and knead for 8-10 minutes until the dough is incredibly smooth, elastic, and no longer sticky. It should feel supple like your earlobe.
- First Rise
Place the kneaded dough ball in a lightly oiled bowl, turning to coat. Cover with a damp kitchen towel or plastic wrap. Let it rise in a warm, draft-free spot for about 1 hour, or until doubled in size. This is the first fermentation that builds flavor and structure.
- Shape the Buns
Punch down the risen dough to deflate. On a clean, unfloured surface (a little sticking helps create surface tension), roll the dough into a long log. Divide it into 8 equal pieces. Roll each piece into a smooth ball, then use a rolling pin to flatten into a 4-5 inch oval. Brush the top lightly with oil, then fold in half. Place each bun on a small square of parchment paper.
- Final Proof & Steam
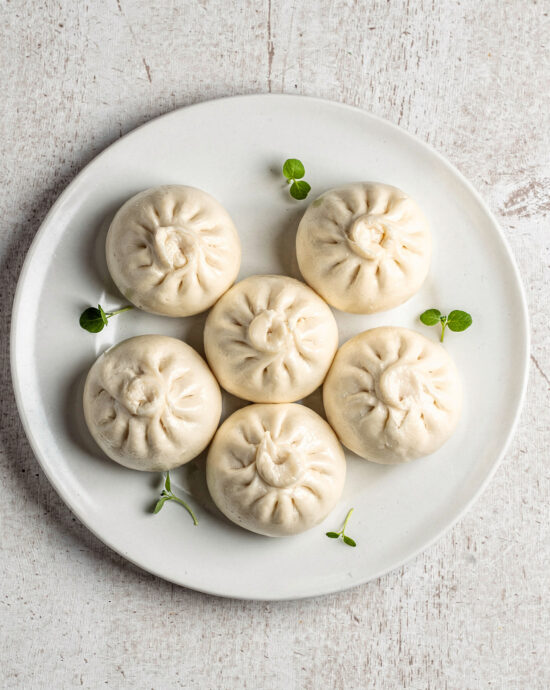
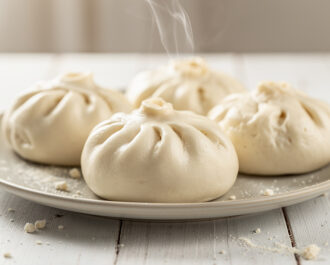
Arrange the shaped buns in your steamer, leaving about 1 inch between them for expansion. Cover and let them proof for a final 20-30 minutes until they look puffed. Meanwhile, bring water in your steamer base to a boil. Once proofed, place the steamer over the boiling water. Steam on high heat for 12-15 minutes. CRITICAL: Do not open the lid during steaming. Turn off the heat and let them sit, covered, for 5 minutes before carefully removing the lid to prevent wrinkling.

- Calories:180 kcal
- Protein:5 g
- Carbohydrates:32 g
- Sugar:5 g
- Salt:0.1 g
- Energy:753 kJ
- Fat:4 g
I’ll admit it: there’s a certain kind of kitchen confidence that comes from mastering a great dough. But for years, the thought of making my own bao buns felt daunting—like something best left to dim sum masters. That was, until a rainy Sunday craving for those impossibly soft, pillowy steamed buns sent me on a mission. My aha moment? The magic isn’t in complexity, but in patience and steam. Forget searching for ‘bao steamed buns near me’. Making this classic Chinese steamed bun at home is a revelation, and I promise, it’s easier than you think.
The Legend of Bao Buns
These aren’t just bread; they’re edible history. The story goes that a brilliant military strategist in ancient China, Zhuge Liang, invented a stuffed, steamed bread to honor soldiers lost crossing a treacherous river. He called them ‘mantou’—’barbarian’s head’—a bit grim, but the technique of steaming dough to create soft, supple buns has evolved into the beloved staple we know today. From the Cantonese char siu bao to delicate Japanese nikuman, the family of Asian steamed buns is vast and wonderful.
What Makes These Bao Buns Special
These aren’t dense dinner rolls. A perfect steamed bao is all about texture: a skin so delicate it glistens, and an interior that’s airy, light, and melts on the tongue. The ‘secret’? A bit of fat and a double fermentation. Using a touch of oil in the dough and letting it rise twice creates those signature tiny, even bubbles. It’s the difference between good and ‘close your eyes and sigh’ great. This recipe delivers that classic, fluffy steamed bun experience you crave.
The Essential Pro-Tip for Perfect Steam
Here’s the game-changer: don’t peek. The single biggest threat to your homemade Chinese steamed buns is a sudden drop in temperature. When you lift the lid of your bamboo steamer (or whatever steamer you’re using) mid-cook, you release precious heat and moisture, which can cause the buns to collapse or become tough on the surface. Trust the timer. Let that steam work its magic uninterrupted for those perfectly pillowy results.
Serving & Pairing Ideas
Of course, you can fill these soft Asian buns with glorious BBQ pork for classic char siu bao. But think beyond! They make incredible vessels for crispy tofu with pickled veggies, or shredded braised chicken. Slice them open for the ultimate steamed bun burger. For a drink pairing, a light, floral jasmine tea cuts through richness beautifully, or a crisp, cold lager works wonders. Try them alongside a simple cucumber salad with a rice vinegar dressing for a refreshing contrast.
Variations & Substitutions
The beauty of this dough is its versatility. Craving sweet steamed buns? Fill them with a dollop of red bean paste or lotus seed paste for Chinese steamed custard buns. For a vegan version, simply use a plant-based milk and ensure any filling is dairy-free. You can find recipes for easy steamed pork buns or even experiment with making your own chocolate steamed buns if you’re feeling adventurous. If you don’t have a traditional bamboo steamer, a metal steamer insert or even an Serious Eats-approved Instant Pot on the steam function works great for cooking steamed buns.
Make-Ahead & Storage Tips
These are best fresh, but you can absolutely get ahead. The shaped, uncooked buns freeze beautifully. Place them on a parchment-lined sheet, freeze solid, then transfer to a bag. Steam directly from frozen, adding a few extra minutes. Leftover cooked buns keep in the fridge for 2 days. Reheat by steaming for 3-4 minutes to revive that soft texture—microwaving will make them tough.
Frequently Asked Questions
Can I make steamed buns without yeast?
While possible with baking powder (creating a ‘mantou’ style), yeast gives the characteristic fluffy, slightly chewy texture and complex flavor that defines classic bao. I highly recommend sticking with it.
What’s the best flour for the dough for steamed buns?
A low-protein all-purpose or even cake flour is ideal. You want a tender, soft crumb, not a chewy, gluten-heavy one like bread flour would create.
My buns wrinkled after steaming. What happened?
This usually means the dough wasn’t proofed enough before steaming, or they were exposed to a draft while cooling. Ensure your final proof is in a warm, draft-free spot until they look puffy and light.
So, are you ready to fill your kitchen with the warm, comforting scent of steamed dough? Rolling, filling, and pinching these little clouds is my favorite kind of kitchen therapy. The reward—tearing open a warm, homemade bun to reveal your filling of choice—is pure joy. I’d love to hear how yours turn out, and what crazy-delicious fillings you invent! Share your triumphs in the comments, and don’t forget to browse our recipe collection for more inspired eats.